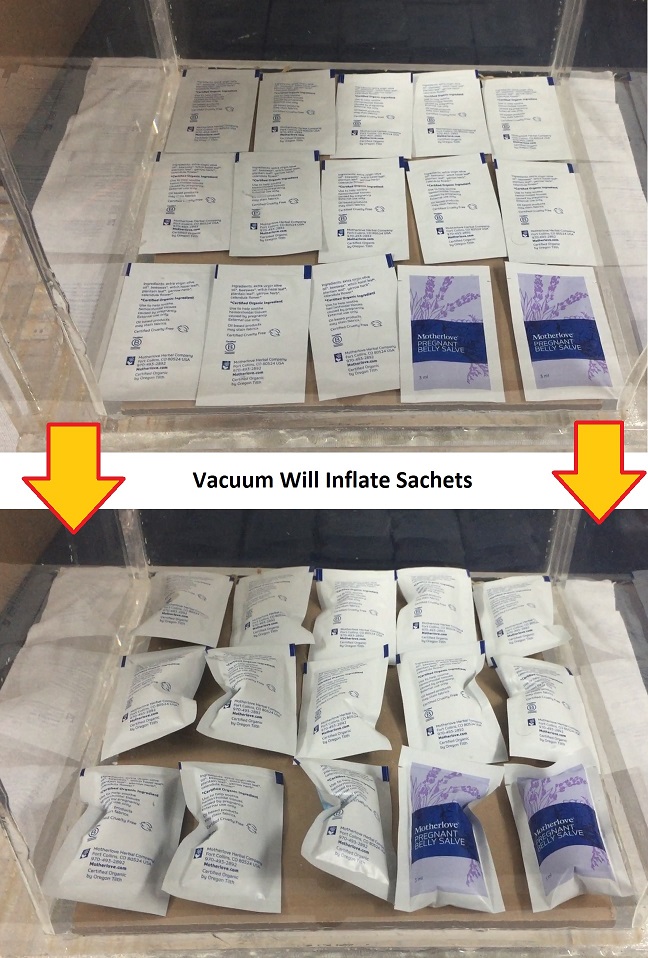
In this article, we will talk about how a vacuum chamber can be utilized as a tool to perform leak quality testing on Sachets filled with either powder or liquid. You can use an Acrylic Vacuum Chamber or a Vacuum Bubble Leak Testing System to test for leaks in sachets filled with powder or liquid.
There are several dozen ways a leak test can be performed on a sachet. In this write up, we will talk about two of the most popular ways you can use a vacuum chamber to leak test sachets filled with powder or liquid. The first test is a so-called dry test, the other test is a wet test.
Dry Quality Leak Test
Dry test is simply the use of a dry vacuum chamber (generally without water) to perform a seal integrity test. A sample is placed inside the vacuum chamber, vacuum is applied, and the behavior of the sachet determines the results of the test.
Wet Quality Leak Test
A wet test utilizes a Vacuum Bubble Leak Testing System, which in a way is an Acrylic Vacuum Chamber filled with water. The sample is dunked underwater while vacuum is applied and the presence of bubbles is inspected for.
Performing a Dry Vacuum Package Leak Test
[Click on Image to Enlarge]
This test is done by placing your specimen into a vacuum chamber and then pulling a vacuum. There are several outcomes from this test. By examining how the sachet bag behaves under vacuum, the experimenter will be able to determine whether the sachet is a PASS or FAIL. Furthermore, the Failure Type, or how the sachet failed under vacuum, will help you determine sachet seal failure mode and what steps you will need to take further in order to improve the quality of your sachet seal.
The Dry Vacuum Test is performed in four steps: 1. Placing the Specimen into the vacuum chamber, 2. Pulling a vacuum, 3. Holding a vacuum, and 4. Releasing the Vacuum
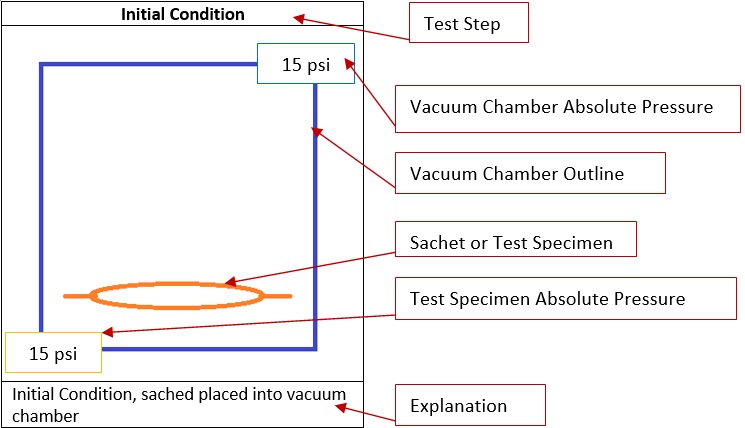
The image shows the Test Step as “Initial Setup” meaning that this is the step at which the specimen is placed into the acrylic vacuum chamber.
Vacuum Chamber Absolute Pressure is shown in the Top Right Corner. This specifies the absolute pressure of the vacuum chamber. Keep in mind that absolute pressure is referenced to perfect vacuum. In our case, it is 15 psi (which means that this test is performed close to sea level). Depending on your altitude, the ambient pressure will vary.
Vacuum Chamber Outline is the blue line which outlines the realm that is referenced as the inside of the vacuum chamber.
Test Specimen, is shown as a cross section, in orange color.
Test Specimen Absolute Pressure, is shown in the Bottom Left Corner. This specifies the absolute pressure of the inside of the sachet. If the sachet was vacuum sealed, the inside pressure would be lower than the ambient pressure.
Explanation is simply a detailed description on what is happening during a particular test step.
A Good Dry Leak Quality Test (PASS)

[Click on image to enlarge]
Place the specimen into the vacuum chamber, close the lid and apply the vacuum. The sachet will expand or inflate as the vacuum begins to increase. Once you reach your desired vacuum level, close the vacuum valve and hold the vacuum for a specified amount of time. During the hold phase, the test specimen will stay inflated while the sachet is under vacuum. After the hold phase, open the venting valve and begin releasing the vacuum. As the vacuum decreases, the sachet will begin to deflate and return back to its initial form.
Test Result:
This simply means that you have a good seal and package.
Micro Leak Failure

[Click on image to enlarge]
A microleak is a leak which is too small to be seen by the naked eye. A good way to detect a micro leak is to simply place the specimen into the vacuum chamber, close the lid, and pull the vacuum.
During the evacuation phase, the test specimen will begin to expand. Once you have reached your desired vacuum level, close the vacuum valve and hold the sample inside the vacuum for a specified amount of time. The sample will stay inflated and may even start to deflate towards its initial form. Release the vacuum and watch the sample. As all vacuum is released, the sachet will contract and compress and look like it was vacuum sealed. All this means is that the sachet lost air due to a microleak.
Test Result:
A microleak may not be detectable initially, however, when the vacuum is pulled, air pressure inside the sachet is larger than on the outside of the sachet. What happens is this air starts to travel through this micro leak, but it cannot escape fast enough which is why the sachet inflates during the evacuation phase. During the hold phase, enough air will escape to drop the pressure inside of the sachet bag to less than atmospheric pressure. Once the vacuum is released, the ambient pressure will be larger and apply force onto the sachet and therefore collapse it.
Gross Leak Failure

[Click on image to enlarge]
A gross leak is large enough to be seen by the naked eye. However, due to the way the sachet is heat sealed, it may not be easily detectable.
During the evacuation phase, the sachet will not inflate and simply keep its original form. You will not observe any changes in the volume of your sachet. Sachet does not expand and no change in size is observed. This is because a large leak is present where the air escapes from sachet before it has the chance to inflate the specimen.
Test Result:
A gross leak is large enough to allow air to escape out of the sachet fast enough without ever inflating it.
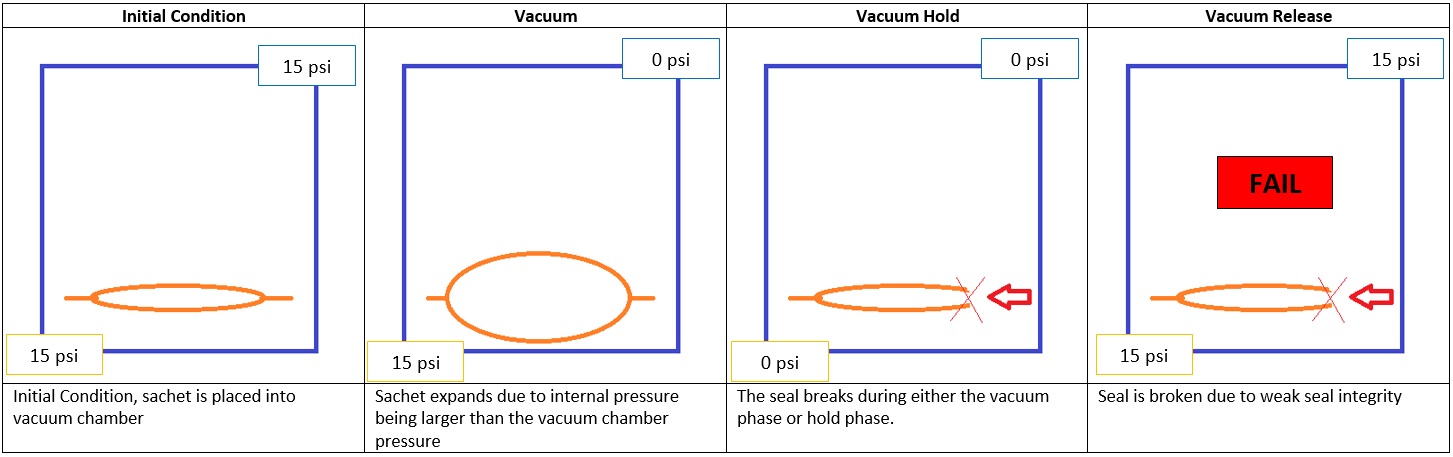
Seal Integrity Failure
[Click on image to enlarge]
During the evacuation phase, the test sample will inflate and then pop. Sachet expands due to internal pressure being larger than the vacuum chamber pressure. The seal breaks during either the vacuum phase or hold phase. Seal is broken due to weak seal integrity.
Test Result:
A weak seal failed to hold the heat-sealed film together as the pressure inside the sachet increased.
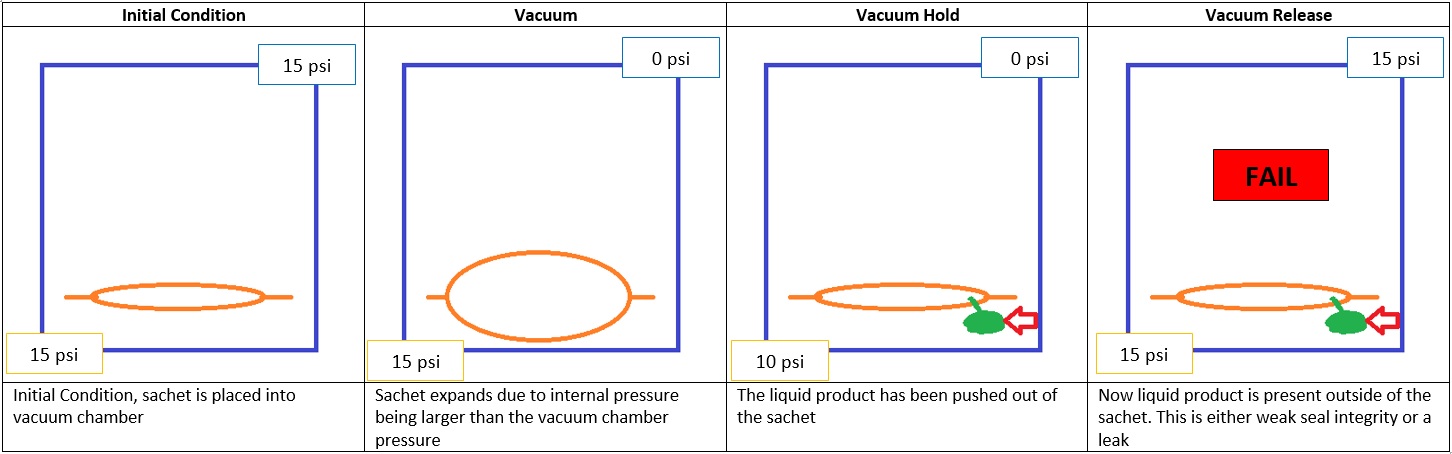
Content Expulsion Failure
[Click on image to enlarge]
During the failure mode, the product inside the sachet is expelled, or pushed out of the sachet. The contents may expulse by breaking the seal or through a micro or gross leak. This failure mode is limited only to liquids since solids or powders do not have surface tension.
Test Result:
Expulsion Failure happens in two different ways.
1. The increased pressure inside the sachet during the vacuum test forces the liquid to travel along the leak path and out of the sachet from the higher pressure (inside of sachet) towards the lower pressure (outside of sachet).
2. During the evacuation phase, the air trapped inside the liquid will begin to expand and apply forces onto the sachet heat seal. If the seal is weak, a leak path will develop and force the liquid out of the sachet.
Other Failure Modes:
There are other failure modes
I know that we said that solids do not expand under vacuum; well, that is not always the case. We have witnessed a test where the vacuum caused the solid to expand and damage the seal.
We have also witnessed another failure where the product inside moved in such a way that it punctured a hole into the seal.
Always investigate and study your test procedure and method so that you can fully understand what exactly you are trying to accomplish during your test.
Dry Vacuum Test Limitations
A vacuum test can only be performed on sachets which were sealed under ambient conditions. If the sachet was vacuum sealed, it may not have enough air inside to generate considerable pressure difference between the sachet inside and outside during the test.
Another limitation is that this is a visual inspection and dependent on the observer which also means that it is operator dependent and subjective. Fortunately, this limitation can be well mitigated by implementing good test procedures and training the operators.
Only leaks of 10-3 cc-atm/sec are detectable. This means that leaks that are smaller will not be detectable due to the time constrains. A really small leak will not emit enough air out of the sample to make a difference.
Performing a Wet Vacuum Package Leak Test
A wet vacuum package test is simply a bubble leak test on your sachet bags by placing them inside a water filled vacuum chamber and pulling a vacuum. We have a more in-depth write up on the bubble leak test here: (Bubble Leak Testing using an Acrylic Vacuum Chamber), but if you are new to this, let’s keep going.
The vacuum will create a pressure difference between the inside of the sachet bag and the outside of the sachet bag. If a leak exists, the air will start to travel from a higher pressure (inside of sachet) to a lower pressure (outside of sachet) and you will be able to see bubbles. One advantage of a bubble leak test is that you can locate the leak through the presence of bubble emission, whereas during the dry test, it is much more difficult to locate the leak.
Another advantage of testing sachet with dry powder is that even though you do not see the leaks, a leak may be present and you will be able to detect leaks inside the sachet if water is present in the powder after you have completed your bubble leak test. This is because if a leak is present, the water will be pushed or pulled into the sachet through the leak path.
To correctly detect water inside your sachet, be sure to fully dry your specimen after the bubble leak test. After you have sufficiently dried the outside of your sachet, open it, and look for moisture or water presence.
Similar Items
Our clients prefer to work with us because we are Experts in Vacuum Science and Technology. You should check out some of our other items we carry; click on the links below.