Bubble Leak Testing, also known as Bubble Emission Testing, is a precise, visually intuitive, and highly effective method for detecting and pinpointing leaks in packaging and sealed systems. By submerging a test specimen in water and monitoring for bubble emission, leaks can be swiftly identified with clarity, making this approach one of the most straightforward yet powerful techniques for integrity testing. In this discussion, we will explore the application of acrylic vacuum boxes as robust leak detection devices, looking into their advantages, potential limitations, the science behind internal pressurization, and the detailed procedures involved in vacuum bubble leak emission testing.
For those seeking a deep, comprehensive exploration of this subject, "Vacuum Bubble Leak Test: A Comprehensive Guide" offers an extensive analysis covering every nuance of the methodology, its applications, and industry best practices. However, if you need a concise yet information-rich breakdown, you’re in the right place. This article provides a structured approach to understanding bubble leak testing, ensuring that readers gain both foundational knowledge and practical insights into its execution.
It is crucial to recognize that not all bubble leak tests are created equal. A variety of testing methodologies exist, each tailored to specific materials, packaging types, and industry requirements. This article focuses on the two most widely recognized and adopted standards for bubble emission detection, ensuring compliance with stringent industry regulations and best practices:
■ 1.
ASTM D3078 : Standard Test Method for Determination of Leaks in Flexible Packaging by Bubble Emission
Widely used for non-porous, flexible packaging applications where vacuum-based leak detection is essential.
■ 2.
ASTM F2096 : Standard Test Method for Detecting Gross Leaks in Packaging by Internal Pressurization (Bubble Test)
A powerful technique designed to identify larger, more significant leaks by introducing controlled internal pressure to the test specimen.
Understanding and implementing these industry-standard methodologies is critical for manufacturers, quality assurance professionals, and regulatory bodies aiming to maintain the highest levels of product safety, compliance, and reliability. By mastering these procedures, companies can safeguard their packaging integrity, optimize quality control processes, and confidently meet industry standards for leak detection and prevention.
See our Bubble Emission Leak Testing Systems Catalog
What is a Bubble Leak Test?
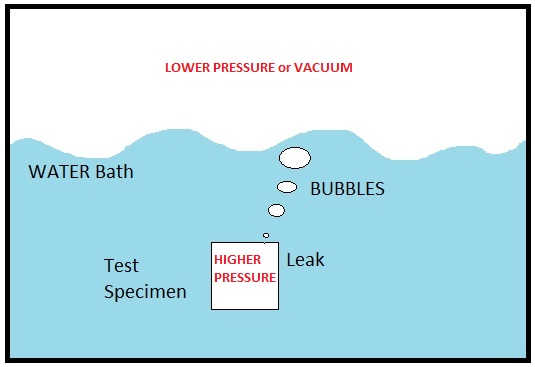
Also referred to as the Bubble Emission Test, Submersion Leak Test, Underwater Immersion Leak Test, or "Dunking Test," this widely recognized leak detection method is used to identify and locate breaches in a test specimen by observing the visible emission of gas bubbles. The fundamental principle behind this technique is simple yet effective, when a test sample containing trapped gas is submerged in water, any leaks will cause gas to escape, forming bubbles that provide a direct visual indication of the defect. This method is extensively used across industries requiring airtight or watertight seals, such as flexible packaging, medical device manufacturing, and industrial containment applications.
Bubble leak testing can be performed using two primary methodologies: the Pressurized Bubble Emission Test (ASTM F2096) and the Vacuum Bubble Emission Test (ASTM D3078). In the pressurized method, the test specimen is subjected to internal pressurization, forcing gas outward through any existing defects. This approach enhances leak visibility due to the increased pressure differential, making it highly effective for detecting gross leaks. However, it introduces additional complexities, such as the risk of over-pressurization, which may cause fragile specimens to rupture or deform. The need for controlled pressure input and specialized equipment adds to the method’s complexity, making it less practical for delicate materials.
Conversely, the vacuum method relies on external pressure reduction rather than internal pressurization. The specimen is placed inside a vacuum chamber or an acrylic vacuum box, where the surrounding pressure is lowered, causing any trapped gas within the test sample to expand and escape through leaks. This technique offers a more straightforward and non-destructive alternative to pressurization, making it ideal for applications where sample integrity must be preserved. Although it may not achieve the same level of aggressive leak detection as the pressurized method, its simplicity, ease of implementation, and reduced risk of specimen damage make it a preferred choice for many industries.
For it's cost,the bubble leak test provides exceptional sensitivity, capable of detecting leaks with an accuracy of 0.05 sccm, identifying hole sizes as small as 0.001 inches (0.025 mm) in diameter. While such micro-defects are imperceptible to the naked eye, the test’s ability to reveal leaks through bubble formation makes it a valuable quality control tool. Compared to other non-destructive leak testing methods, such as pressure decay, air decay, dye penetration, or flow rate leak testing, the bubble emission test is among the most cost-effective and reliable techniques available. However, for ultra-high sensitivity applications, methods like helium mass spectrometry, tracer gas analysis, and high-vacuum gas sniffing surpass its detection capabilities. Despite this, bubble leak testing remains a cornerstone technique for ensuring packaging integrity, medical device reliability, and industrial leak-proofing, providing a practical balance between accuracy, affordability, and ease of execution.
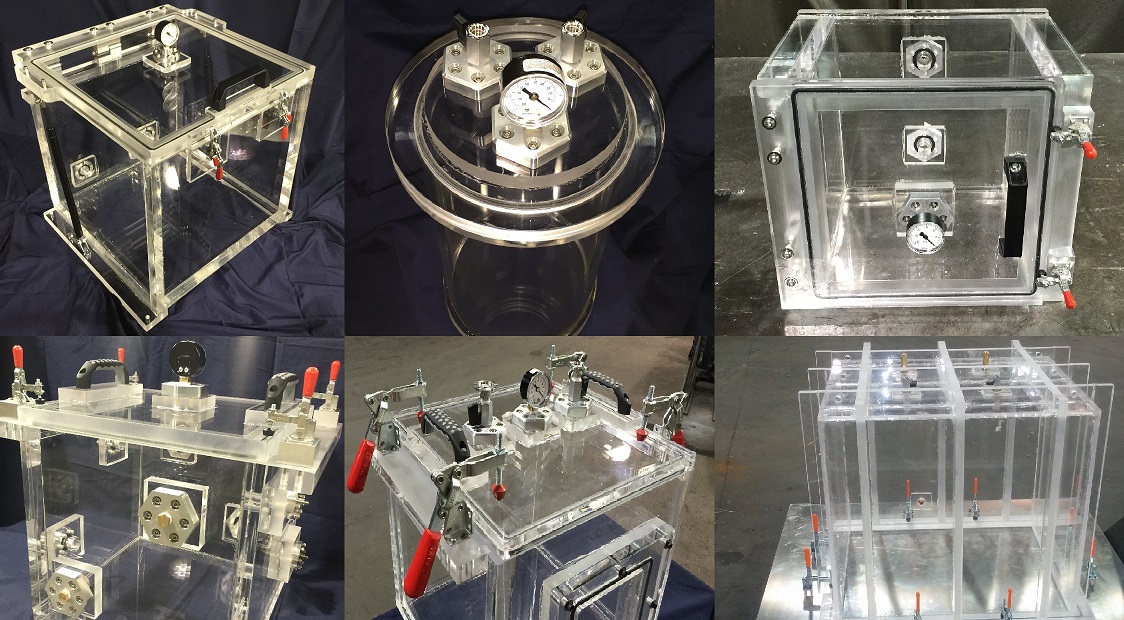
Bubble Emission Leak Testing Equipment
Integrity Testing utilizing a Vacuum Chamber (ASTM D3078)
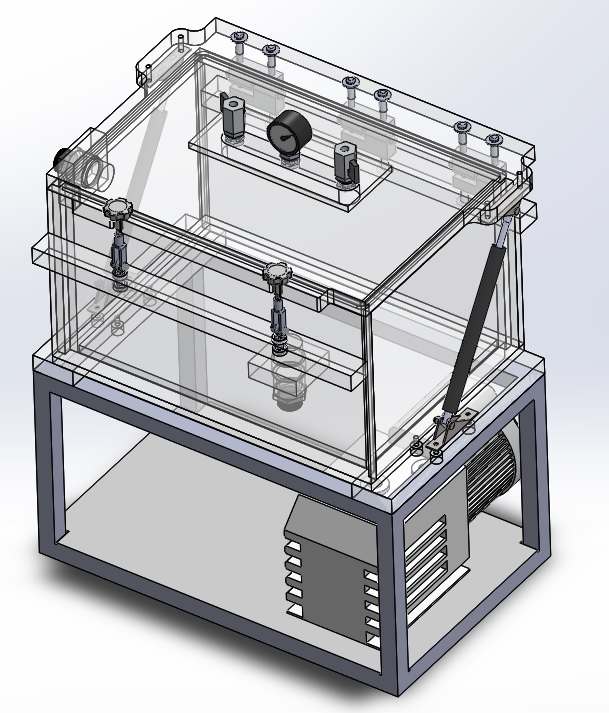
The optimal choice for bubble leak testing equipment is an acrylic vacuum chamber, primarily due to its transparent construction, which provides an unobstructed, full-field view of the test specimen during evaluation. This real-time visibility is critical for detecting and analyzing bubble emissions with precision. Beyond its superior optical clarity, acrylic chambers are also the most cost-effective solution, offering an exceptional balance between affordability and detection accuracy. Their lightweight yet durable nature makes them a practical and efficient option for leak testing across various industries.
For the vacuum system to function effectively, the acrylic chamber must be paired with a vacuum pump, typically either a rotary vane pump or a Venturi pump. A rotary vane pump, powered by electricity, is capable of achieving a higher vacuum level of approximately 30 in Hg and operates independently of external compressed air sources. This makes it an ideal choice for setups without access to pressurized air lines. On the other hand, a Venturi pump relies on a pressurized air supply rather than electricity, generating a solid vacuum of around 28 in Hg. While slightly lower in vacuum strength than the rotary vane pump, the Venturi system provides a reliable, energy-efficient alternative in facilities where compressed air is readily available.
The decision between these two vacuum pumps ultimately depends on operational requirements and available utilities. Neither option is inherently superior—both are highly viable solutions, each with its own strengths. A rotary vane pump excels in environments where electric power is preferred, ensuring a high-performance vacuum without the need for compressed air infrastructure. Meanwhile, a Venturi pump offers a streamlined, low-maintenance solution that eliminates electrical dependencies, making it particularly advantageous for facilities equipped with pressurized air systems.
By carefully evaluating testing needs, facility constraints, and cost considerations, users can select the most suitable vacuum system for their bubble leak testing setup, ensuring optimal performance, reliability, and efficiency.
Integrity Testing utilizing an Internal Pressurization System (ASTM F2096)
An alternative yet highly effective method for detecting gross leaks in sealed packaging involves internal pressurization preferably using a Pitot-Style Static Probe (for feedback pressure) or single needle if feedback pressure is not needed. Unlike vacuum-based detection systems, this approach eliminates the need for a vacuum chamber or pump, relying instead on a precisely controlled pressure system to identify leaks. This system comprises a pressure source, a high-accuracy vacuum regulator, a static probe, and a Magnehelic Differential Pressure Gauge, working in unison to ensure precise leak detection with minimal complexity.
A key distinction of the internal pressurization method is its ability to offer superior control over applied pressure, enabling more refined testing conditions. By puncturing the test specimen with the static probe, pressurized air is introduced into the package, creating a controlled internal environment that can be manipulated for leak detection. This method enhances maneuverability, allowing the specimen to be rotated, tilted, or repositioned during testing without the constraints of a sealed vacuum chamber.
Beyond its operational flexibility, this technique also reduces equipment dependencies. Unlike vacuum-based systems, no vacuum pump, O-rings, or specialized sealing mechanisms are required, simplifying both setup and maintenance. By eliminating these potential failure points, internal pressurization ensures a more streamlined and efficient testing process that minimizes operational disruptions and ongoing maintenance requirements.
While the probe insertion process does puncture the test specimen, making it a destructive test, this tradeoff is often outweighed by the method’s enhanced control, ease of handling, and reduced system complexity. For applications where precise pressure modulation and unrestricted specimen positioning are critical, internal pressurization via a static probe presents a powerful and highly practical alternative to traditional vacuum-based leak detection techniques.
What are the KEY ADVANTAGES of a Bubble Leak Test?
1. Cost Effective Seal Integrity Testing:
When it comes to product seal or closing integrity, there are no better methods for your wallet than the water immersion leak test. In fact, the next best method is an order or two of magnitudes more expensive.
2. Simple and Easy Leak Test
Placing your test specimen into a water bath, pulling a vacuum, and looking for bubbles is a pretty simple way of detecting and locating leaks. This is advantageous because production line operators without much training can perform this test.
3. Practical Testing of Leaking Pouches and Packages
All that is needed is an acrylic box and a vacuum pump to perform this test. The accuracy of the test is pretty good for most commercial and medical packages.
4. Visual Detection and Location of Package Leaks
Leaks can be visually detected and located within seconds.
5. Quick Sample Prep
Many test samples do not require much preparation meaning that the test process flow can go very smoothly.
6. Versatile Testing Method
The bubble leak test can be utilized on variously shaped and sized specimen - whether that may be a pouch, tray, box, vial, bottle, etc…
What are the DRAWBACKS of a Bubble Leak Test?
1. Destructive Package Test
Even though the inside of the package is not damaged or destroyed by water, bubble immersion leak test is considered a destructive test. Keep in mind that the insertion of the pitot-style static probe does create a punctured hole on the package itself.
2. Subjective Leak Detection Method
The bubble emission requires the involvement of a testing person. This induces subjectivity into the testing method. The testing operator must be engaged and involved in the test otherwise the false positives may ensure.
3. Preparation and Handling of Sealed Specimen
The test specimen must be cleaned and prepared for the leak test. Also, some may not like the inconvenience of dealing with wet parts.
4. Bubble Emissions Test Procedures are Specimen Dependent
Products which are sensitive to water, such as electronic equipment, may not be suitable for this testing method. Leaks cannot be quantified, there is no way to know how large or small the leak is, only where it is.
Package Testing using Vacuum vs Internal Pressurization
There is no right answer when it comes to selecting an internal pressurization method vs vacuum method. Instead, you should ask yourself what is the best option for our customers? What is the best option for our testing facility? What is the best option for our current business processes? This is something that we cannot answer for you, this is something that you must decided for yourself.
| Method | Vacuum Chamber | Internal Pressurization |
| ASTM Standard Guidance Document | D3078 | F2096 |
| Requirements | Vacuum | Pressure |
| Specimen Investigation | No Puncturing Required | Package must be punctured |
| Handling During Test | Cannot be rotated during leak test | Can be rotated during testing |
| Pressure Differential Accuracy | Less precise | More precise pressure |
| System Complexity | More Complex Vacuum System | Less Complex Pressure System |
The Methods vary when it comes to the ASTM Standard Guidance Document. The Vacuum Chamber and the Internal Pressurization are guided by ASTM D3078 and F2096 respectively. The vacuum method requires a vacuum source whether that be a vacuum pump or a pressure driven venturi pump. The Pressure method, will require a pressure source and pressure regulating equipment. The specimen investigation does not require puncturing of specimen during the vacuum leak test; on the other hand, the internal pressurization will require puncturing of sample with a probe to inflate with air. The sample cannot be rotated or handled during the test in a vacuum chamber, this is something that can be done with the Internal Pressurization method. The pressure control is better and more precise with the Internal Pressure method because the pressure can be set much more accurately. The vacuum system is more complex because the internal chamber has be air tight and sealed in order to enable vacuum to be pulled.
Bubble Leak Detection Limitations
There are some limitations when it comes Bubble Leak Detection. The only reason bubbles are emitted is because there is a pressure difference between the inside and the outside the of the specimen. The air is driven from a higher pressure environment into a lower pressure environment.
Minimum detectible leak rates
The consensus among vacuum leak testing experts is that minimum detectable leak rate of a bubble emission test is 10-3 standard cubic centimeter per second. A standard cm3 is the volume equal to three dimes stacked vertically. This means that at leak rate of 10-3 std cm3 per second it will take about 100 seconds for 1 cubic centime to leak.
Bubble leak test on permeable materials
Bubble leak test cannot be performed on materials that are permeable because the moment that the bubble leak test is initiated, hundreds of bubbles with starts emerging from material. This will make the locating and pinpointing of holes almost impossible.
Subjectivity of Visual Detection of Bubbles
The subjectivity of this testing method also comes to question when we look into the frequency and size of air bubbles. Assuming that the smallest air bubble that the naked eye can reasonably see in a bubble leak experiment is about 1 mm in diameter. And assuming a perfect air bubble sphere with 1mm (0.1cm) diameter; hence a spherical volume of 5.24×10⁻⁴ std-cc. This means that at leak rate of 10-3 (std-cc/sec) the specimen would emit about 2 air bubbles per second.
Limited Air trapped inside of Specimen for Bubbles Emission
Another limitation is the fact that there is a limited amount of air trapped inside the specimen if not air is supplied to the test specimen. This means that less and less air and hence lower and lower pressure is present inside the specimen meaning that at low air volumes, there will not be enough air emitted from the sample for appropriate detection.
Small Improvement if the Specimen is Already Pressurized
Finally, a vacuum chamber may not be much value add if the test sample is already pressurized to a high pressure. Let’s just assume that the specimen is already pressurized to 200 psi gauge absolute and then submersed into a bubble test tank. As mentioned earlier, bubble emission is cause by a pressure difference and the formula below:
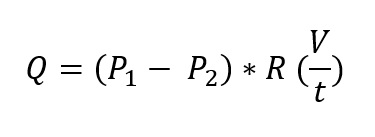
Q = the leak rate
P1 = Is the pressure inside the test sample
P2 = Is the pressure outside of the test sample
R = is the gas constant
V = Volume
t = time
This simply means that the pressure difference times a constant times the change in volume over time determines the leak rate. Lets just assume that R, V, and t are 1 to make our illustration simpler.
In our case, the part is already pressurized to 200 psi and the ambient pressure is 15 psi our leak rate will be:
200 – 15 = 185 units
If you dip this pressurized part into a tank and draw vacuum, your pressure difference will be 200 psi.
200 – 0 = 200 units
Our leak rate would improve a mere 7.5%. This means that you would see 7.5% more bubbles. If the part is pressurized this way, it would not make much sense to place a part with such internal pressurization into a vacuum bubble leak tank.
On the other hand, if a second part is sealed at ambient pressures 15 psi, one way to create a pressure difference is to place this part into the water tank and draw a vacuum. The higher the vacuum is drawn, the more bubbles will emit.
We do have another more comprehensive guide to Vacuum Bubble Leak Testing at: Vacuum Bubble Leak Test, A Comprehensive Guide.
See our Bubble Emission Leak Testing Systems Catalog
Complete List of Articles Related to Acrylic Vacuum Chambers